GOJO CXM Web to Lead feature allow you to build a web form based on leads fields and custom fields to place it on your website, landing page etc as an iframe.
The visitors can then enter their names, email addresses, upload attachment and other basic information to create a lead directly in GOJO CXM.
To create new web to lead form, from the main admin menu navigate to Setup->Leads->Web To Lead
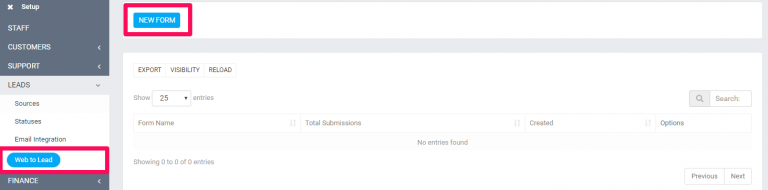
Click on the button on the top left side New Form
NOTE: You will be able to build the form after you first create the initial form including all the settings.
- Form Name – Give your form a name, it’s for personal use and also will be displayed in the lead profile when you open lead.
- Language – The language is currently used only for the validation messages.
- Submit button text – The bottom where the user will need to click to submit the form E.q. Request a Quote or Contact us, feel free to adjust to fit your needs.
- Message to show after the form is successfully submitted – This message will be shown after use successfully submit the form.
- Allow duplicate Leads to be inserted into a database? – Often in web to lead forms duplicate leads are inserted into database. GOJO CXM has the ability to prevent this from happening by auto creating the lead as task including all form data as a description instead of inserting directly to the leads database, in this case, the responsible staff member will need to analyze the lead data and take further actions.
- Source – Default lead source
- Status – The lead will need to be in status after successfully is imported into GOJO CXM database.
- Responsible – Auto assign the lead to a specific staff member.
- Notification settings – All users based on the notification type will be notified via built in notification inside GOJO CXM and additionally the responsible lead staff member will get an email notification if in Setup->Email Templates -> New Lead Assigned to Staff Member is not checked as disabled.
- Recaptcha – You can use Google Recaptcha to prevent spamming. The field for Google Recaptcha will be shown only if you have previously configured the recaptcha keys.
After you create the form 2 new tabs will be shown in the form area Form Builder and Integration Code.
- Form Builder – The place where you build the form and adjust all the fields you need.
- Integration Code is the code you will need to place into your website the form to be shown, note that from the link you will be able to see that each for have unique key.
Building The Form
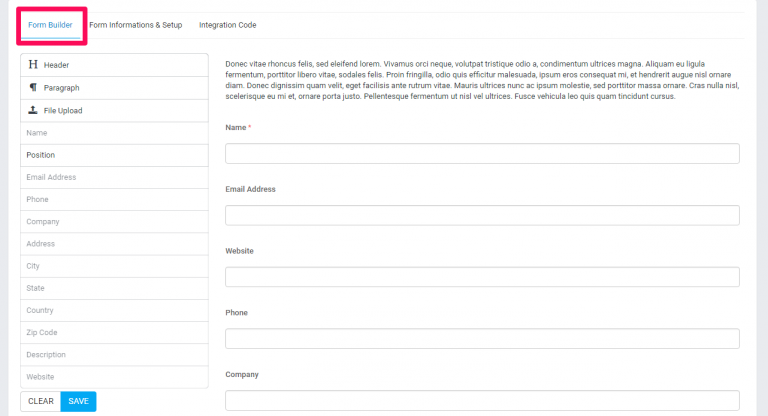
When you save the initial form settings you will be automatically pointed on the Form Builder tab and on the left side you will be able to see all the available form fields taken from the lead profile. Note that if you have custom fields for leads you will be able to include your custom fields inside the form easy with drag and drop.
There is only 1 exception where the custom fields of type Hyperlink do not have support to be included in the web to lead form.
To add a field to the form just drag the field to the right side in the form area.
After you drag the field you will be able to see on the left side the dragging ability to this field will be disabled. You can only add the field in the form once to prevent confusion with the form data.
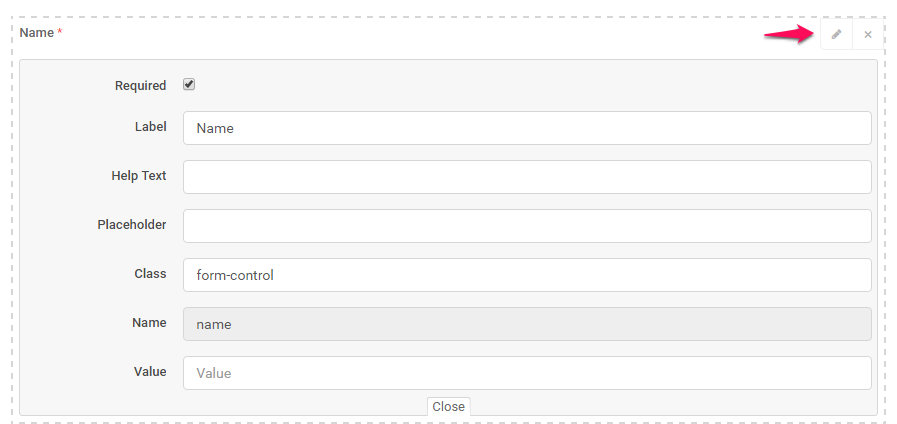
Customizing The Fields
If the fields don’t fit exactly for your needs you can customize the labels, add help text, placeholders and make them required. When you drag the field in the form area just hover over the field on the top right side you will be able to see 2 buttons (edit and remove)
After you customized the form click on the bottom left button SAVE and click on the tab Integration Code to get the code you need to add to your website. The code will be placed as iframe and you can adjust the width and height directly to the code snippet that is provided by GOJO CXM.
Include logo in the form
To include your company logo in the form, you can either share or embed the URL with the query string parameter as shown below:
https://your-gojocxm-domain.com/forms/wtl/715d3e13cea500fc168faa4e3dcb8e24?with_logo=1Create Multi-Column Form Layouts in Web To Lead Form (available from v1.9.0)
By default, the form fields will be added in a single column full width of the document if you want to customize the form and have the fields displayed in multiple columns we have added the ability to achieve this with custom classes applied to the field, you can add up to 12 columns in 1 row.
In the following example, we will create 2 fields in 2 columns and 1 row.
Keep in mind that the columns won’t be applied in the form builder, only when the form is viewed by accessing the integration link or is in an iframe.
Here is a quick example:
Final result:

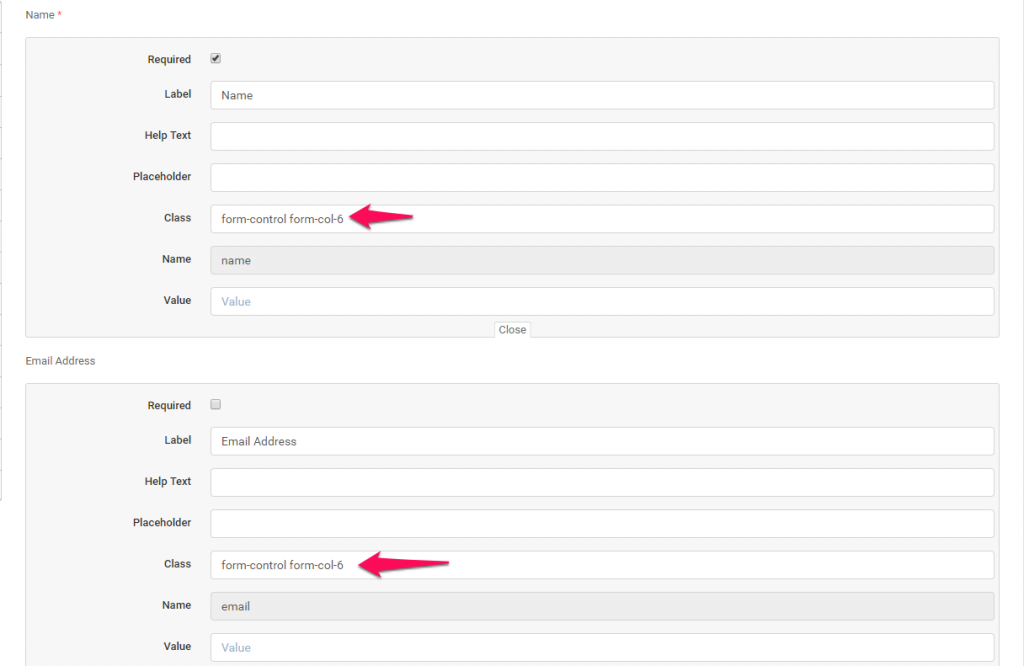
Assume that in your form builder you have 4 fields, as in order Name, Email Address, Company, Address.
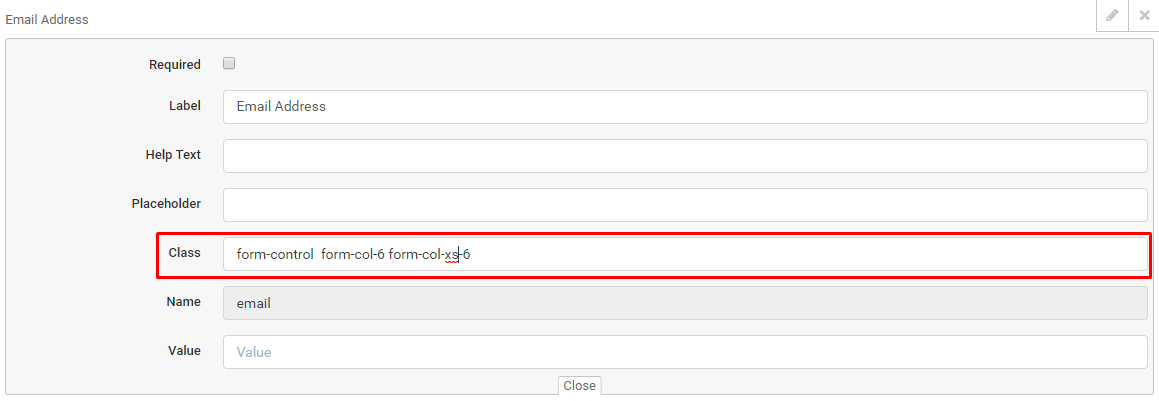
For the first 2 fields click on the EDIT button on the top right side of the field wrapper to slide down the edit area, in the class input add an additional class for both fields form-col-6 as shown in the image below.
Save the form by clicking on the save button and preview the form from the integration link to see the final result.
As mentioned before you can add up to 12 columns, in this case, form-col-6 + form-col-6 = 12, in case you want to add 3 columns apply the class form-col-4 on 3 fields (form-col-4*3 fields will be 12 and the fields will fit the document) that are one by one in order.
|
Because in most cases you will embed the form into a small container/portion of your website, the bootstrap grid CSS will still show the columns new rows (not split in 2 columns), in this case, consider adding another additional class for small containers, for example if you added form-col-6 class, add additional class for small area form-col-xs-6
|
Few things to consider
- Never leave the form without the required fields. By default, the name field will be required, and it’s not recommended to uncheck it as unrequired.
- When placing the iframe snippet code, consider to place the iframe code inside an https (SSL) Page, otherwise, it will not work.